Landscaping and Gardening Services in Pismo Beach and SLO County
Mon-Sat: 7:00AM - 5:00PM
05 Oct 2020

Should Your Yard Have a Focal Point?

Should Your Yard Have a Focal Point

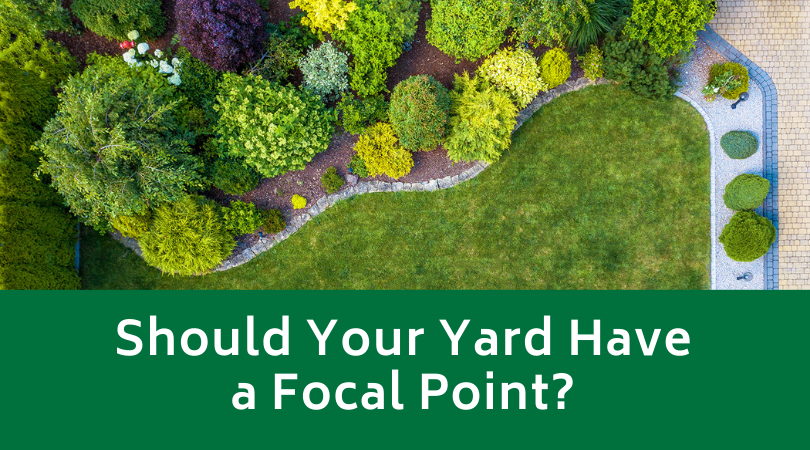
No matter if you have a large or small yard, focal points are nice to have. They can draw your eye around the space in a natural flow, or you can create one that draws people in to gather around. But, should your yard have a focal point? Isn’t it fine by itself? What is the focal point? We’ll answer all of these questions and more below.

What is a Focal Point?

Done correctly, a focal point can be your best friend. It’s an object, container, or plant that gives anyone that sees it an attractive visual entry point. Focal points can direct your guests where to look initially before smoothly directing them to take a glance around the surrounding area. You can create one larger focal point or several smaller ones that you strategically place around your garden or yard to draw your visitor’s eyes. You can also use your focal points to distract people or hide things you don’t want them to see as a utility box.

Four Focal Point Benefits

Although there are dozens of potential benefits with focal points, we picked out what we consider to be the biggest four. They can help you decide if you want to incorporate one into your yard or garden.

  • Intensifies the Surroundings – A colorful or bright container or bench can help amplify the surrounding colors. It can add warm tones to grey areas, or it can make your grass seem greener. In turn, this can make your entire space look warm and inviting.
  • Directs the Eye – If you have a lot going on in your yard or garden, it’s easy to get lost. However, a focal point can help direct the eye from place to place while making it more streamlined. Bright colors grab your viewers’ attention and help them orient themselves.
  • Gives Inspiration – Once your focal point grabs someone’s attention, you can play off it and use it for inspiration for the rest of your yard. Maybe your focal point is a bench. If so, you could center it in your yard and build the rest of your design up around it.
  • Adds Height – Many people get stuck trying to figure out how to add height to a flat garden or landscape. A focal point like a fountain or a planter on a stand is one quick way to accomplish this. Height can also add variety and interest to your yard.

Do You Need Focal Points

No, you don’t absolutely need focal points in your yard or garden. However, they have many benefits that come with them, and they’re relatively easy to use. In the end, it all comes down to personal preference. If you already have a flowing yard or garden planned, a focal point could disrupt it and make it seem disjointed. If you don’t have a plan, a focal point gives you a starting place to build your design.

Contact Evergreen Landscaping

Do you want help deciding if you need a focal point or not? Maybe you have more questions or would like an expert’s opinion. Whatever the reason, contact Evergreen Landscaping today

16 Sep 2020

Energy Efficiency with Your Landscaping

Energy Efficiency with Your Landscaping post

The green movement is in full swing, and we’re all about incorporating energy-efficient tricks into our landscaping projects. Where do you start? Luckily, going green doesn’t mean spending a lot, and you can easily create, design, and maintain your landscaping to save you energy, money, and time. Your landscape will nurture wildlife and reduce general pollution while you get a fantastic yard or garden. The following tips will help you get started. 

Collect Rainwater

If you live in an area that gets a lot of rain, you can easily recycle it by harvesting your rainwater in a barrel. When it comes time to water your plants, you can pull water from your barrel and use it on your pots, smaller flower beds, and other areas around your yard or garden. This will reduce your overall water bill, and this is one way you can keep your plants thriving if you live in an area with periodic water restrictions. 

Use Trees for Shade

The scorching summer sun can make everything seem hot and uncomfortable. Shade trees can cool your yard by several degrees and reduce your indoor temperatures. Having a cooler house means that you will run your air conditioner less, and your air conditioner will run much more efficiently when you have it on. This can prolong your air conditioner’s life and reduce the amount of energy you have to use during those hotter summer days. 

Encourage Vines to Thrive

Vines are very fast-growing, especially when you compare them to trees. To get nicely shaded and cool areas in your yard, encourage vines to climb up walls, trellises, pergolas, or any other taller structure in your yard. Flowering vines will attract bees and hummingbirds, and you can plant climbing vegetable vines to get more overall out of your landscaping. 

Plant Windbreaks

Wind can wreak havoc on your yard, but it can also cause your heating system and energy usage to go through the roof. You can plant a windbreak of thick vegetation in different heights and sizes to prevent seasonal winds from buffeting right up to your home. Evergreens are a nice pick because they give you a lot of protection in both the summer and winter months. 

Add Mulch

We touched on how water is essential in landscaping, and you can use a lot trying to keep up with your plants. However, you can lower your overall water usage by adding a thick layer of mulch around your plants and foliage. This mulch will help keep the plants’ roots cool while locking in moisture. The ground will stay damp for longer periods, and this reduces the amount of time you have to water. 

Install Artificial Turf

Synthetic or artificial turf is a great way to have a gorgeous green yard all summer long that requires very little maintenance and no water. This turf is safe for both humans and animals to walk on, and it mimics the look and feel of real grass with a quarter of the effort. You’ll save energy and water with it. 

Contact Evergreen Landscaping

If you’d like to turn your yard into an environmentally-friendly oasis, contact our team. We’re happy to give you ideas and find the service that works best for your space.

02 Sep 2020

When Should I Replace My Sprinklers?

When Should I Replace My Sprinklers

As homeowners, you take great pride in having a stunning yard. The key to getting this yard and keeping it is a well-designed sprinkler system that uses quality components. It only makes sense that you want it to last for as long as possible without having to constantly maintain or overhaul it. When should you replace your sprinkler system, and what can you do to make it last longer?

Average Lifespan for a Sprinkler System

As a general rule, you can expect your sprinkler system to last around 20 years on average. The components have slightly different lifespans if you use quality materials. Sprinkler heads can easily last between 10 and 15 years, but inexpensive ones will only last between two and three years before you have to replace them. Depending on your climate and water quality, you’ll replace your nozzles every two years.

Your sprinkler system’s pipes are the most durable part of the entire setup, and this means that they’ll last the longest out of any component. The piping can last upwards of 40 years before you have to replace them. You will have to routinely replace the wires due to corrosion. Controllers can last between 5 and 10 years, and valves can last 10 to 15 years.

Damage and irrigation failures can come into play to impact your sprinkler system’s lifespan. Previous repairs, age of the irrigation system, landscape, rodent activity, tree proximity, the quality of the water, and vandalism all help determine how often you replace parts or the whole system. However, the components and the installation quality are the two biggest factors. 

Making Your Sprinkler System Last Longer

There are a few things you can do to make your sprinkler system last longer and resist wear and tear. You can break this general maintenance down into three broad categories.

Spring
Create a start-up procedure for the spring by doing a thorough checkup of your entire system. Look for broken pipes or heads, and make sure everything is functioning at 100%. All of your sprinkler heads should have good overlap, and you want to slowly switch your water on to avoid creating a pressure surge that could damage the pipe fittings or valves.

Mid-Season
You’ll have to fine-tune your sprinkler system as the hotter months come along. Look at the heads on your system and remove any blockages or debris. Check the rotors for damage, and make any necessary repairs you see. The goal is to get your lawn, so the system waters it adequately each time it switches on.

Winterization
As the cooler fall temperatures start to come in, it’s important that you perform winterization tips to help your irrigation make it through the freeze. Use compressed air to blow all of the remaining water out of the lines and valves to avoid freezing. You want a professional to do this step for you, so you don’t accidentally damage something. 

Contact Evergreen Landscaping

If it’s time to inspect or repair your irrigation system, contact us. We can help look for any problems, install a whole new system, or troubleshoot to get your sprinkler system working at 100% capacity again.

19 Aug 2020

Landscaping Ideas Around Signage

Landscaping Ideas Around Signage

Signage is a way to show the public that your commercial property is open, in good shape, and it can create a welcoming environment. One of the best ways to make your signage more visible is to add landscaping around it. The perfect plants, a little color, and attention to all of the small details can make your signs stand out even more. We’ll give you several landscaping ideas you can incorporate around your signage below. 

Incorporate Plants for All Seasons

Yes, cheery yellow daffodils and bright tulips look lovely in the spring, and pink or purple petunias look great in the summer. But the goal is to have your signage stand out through all four seasons. You want to include plants that pop in winter and fall. Ornamental grasses, evergreens, and shrubs are perfect all year round plants. Add fall plants like Geranium Rozanne that turns red and blooms until frost. Dwarf Nandina offers year-round interest with bright foliage and growth in the fall and winter months. 

Hardscape

Keeping the area around your signage neat and tidy can be an ongoing battle, especially if you’re very busy and don’t have a lot of time to dedicate to it. Hardscapes can help you create an attractive area that allows people to get right up to your signs. There is also less maintenance required to keep it looking nice all year round. 

Use Shrubs to Create Impact

If you want your signage to appear bigger, consider adding shrubs to each side of it. Shrubs can also ground your sign and make it seem like it has a sense of place, and you can get them in all different sizes. Shrubs will survive all year round and give your signage an open and welcome feel. If you want something that is very low maintenance and looks green and full through the seasons, try Boxwood. You can shape this shrub to help it fit around your sign. For flowers and color in the spring, plant Dwarf Abelia. This is a semi-evergreen that tolerates drought very well. 

Consider Lighting up Your Signage

The goal of signage is to have the most people see it as possible, including at night. It can be difficult for anyone to make out what your sign says after dusk, but adding lighting can help. You want to make sure any plants around your signs don’t block the light or cast shadows. Try to light up the front and sides of your signs. You can get solar lights that will automatically switch on, or you can get lights you set on a schedule. 

Consider Water Features

Adding water features around your signage is a surefire way to grab people’s attention as they pass by. The soothing gurgle and splash of the water in waterfalls or fountains can work to draw people close enough to get a good look at your sign. You do have to consider maintenance if you go with this option, but the attention it brings you could be well worth the payoff. 

Contact Evergreen Landscaping

If you’re ready to make your signage stand out and you need a professional help, contact us. Our staff is ready to come to your location, look at your signage, and give you ideas to make it pop.


05 Aug 2020

How to Keep Your Backyard Safe For and From Your Pets

How to Keep Your Backyard Safe For and From Your Pets

You want a beautiful yard, but you want a safe area for your pets to lounge and play too. This can be a challenging balance to strike, especially if you’re not sure where to start. Luckily, we’ve picked out a few easy ideas you can try out to help keep your backyard safe for and from your pets below. 

  1. Add a Fence

A fence can serve the dual purpose of keeping your backyard safe for and from your pets. You’ll gain an enclosed area for your pets to run around and play, and a fence can also increase your privacy levels. It can keep anyone from around your neighborhood out that isn’t supposed to be in there. In turn, it can reduce the risks of your pet biting someone who comes to close to their territory. There are dozens of different fences you can put up, but you should pick one your pet can’t get over. 

  1. Add Raised Garden Beds

Yes, you want to have pretty plants and flowers in your yard, but some of these plants can be toxic to your pet if they accidentally eat them. The fertilizer also isn’t good for them if they accidentally walk or dig in it. Adding raised garden beds makes it more difficult for your pets to get inside them. It also provides a barrier between the fertilizer you use and the areas your pets usually play or lounge. 

  1. Fence Off the Compost

As your compost pile decays, it can provide an irresistible place for your pet to roll. They may even want to eat the compost, and this can make them sick. You can still have it in your backyard, but you should have it somewhere that your pet can’t get to it. You can buy compost barrels and store them in there, or you can fence off a small section of your yard to create a barrier for your pets. 

  1. Use Pet-Safe Plants and Flowers

If you have plants or flowers in your backyard, there’s a good chance that your pet will investigate them. You want to ensure that you have non-toxic plants and flowers around, even if they’re not in your pet’s reach. You don’t want accidents to happen. This is also a good idea if you routinely have small kids around that could get into them and potentially get sick. 

  1. Put Your Garden Tools Away

Your pets most likely won’t watch where they’re going when they run around your backyard. If they were to run over a garden tool accidentally, it could injure them. You want to make a point to put all of your garden tools away somewhere that your pet can’t get to them. This could be in your house, garage, or tool storage shed. 

  1. Install Artificial Turf

Half of the battle of letting pets in your yard is the brown spots they can leave. They also like to dig holes. Installing artificial turf is one way to protect your yard against your pets, and it ensures you’ll have a lush and green lawn all season long with minimal maintenance. 

Contact Evergreen Landscaping

If you’re ready to transform your backyard, but you want to keep your pets safe while keeping your yard safe from your pets, contact us. We’re happy to give you suggestions.

22 Jul 2020

When Should I Fertilize My Lawn?

When Should I Fertilize My Lawn

Fertilizing your lawn will help keep it healthy while allowing it to grow and thrive. However, you have to know when to fertilize your lawn to be the most effective. When you apply fertilizer depends on the type of grass you have, the growing zone, and which fertilizer will work best. We’ll break it down for you below. 

Step One – Identify the Grass Type

The first thing you have to do is identify which type of grass you have. You can split the grass type into two broad categories. 

  • Warm-Season – If you have warm-season grass, you most likely live in the Southern region of the United States. These types of grass have a tropical origin, and they grow best in warmer temperatures. They’re very hardy, and this grass will form a thick lawn that gets more dense as time goes on. Centipede grass, Bermuda grass, Kikuyu grass, St. Augustine grass, and Zoysia grass are the main types.
  • Cool-Season – Cool-season grass grows best in the northern half of the United States. Ryegrass, Fescues, and Kentucky Bluegrass are the most common types. They like lower temperatures and have two growing peaks a year. They grow quickly in the early spring and in the early fall. This type of grass can go dormant in the summer if it doesn’t get enough water, and the temperature is too high. 

Step Two – Plan Your Fertilizing Schedule

Once you figure out which type of grass you have, it’s time to learn about the fertilizing schedule. Both types of grass have different needs and schedules.

Warm-Season
The best growing period for this grass is in late spring and early summer. Your temperatures should average between 80 and 95-degrees Fahrenheit. When your grass starts greening up in the spring, apply fertilizer. You’ll need three or four pounds of a fertilizer with a high nitrogen content for every 1,000 square feet. You can apply quick or slow-release fertilizer. Water your grass once you apply the fertilizer. You want the soil to fully absorb it while washing it off the blades of grass. Once the hottest part of the summer passes, apply another round.

Cool-Season
Fall and spring are the two peak growing seasons for this type of grass, and the temperatures should be between 60 and 70-degrees Fahrenheit. You want to fertilize your lawn heavily in the fall months and lightly when spring comes around. You’ll need one or two pounds of slow or quick-release fertilizer for every 1,000 square feet. It should be rich in nitrogen. There are also special fertilizers for the winter you may want to consider to protect your grass in the dormant stage. Make sure you apply the fertilizer early enough in the spring that the grass absorbs it before the hot summer temperatures push the grass to dormancy. 

Contact Evergreen Landscaping

If you’re not sure how to fertilize your lawn or identify it, it’s best to have a professional help you. At Evergreen Landscaping, our friendly and experienced staff are ready to answer your questions, address your concerns, and help you figure out a solid fertilizing schedule for your lawn. Contact us today.

08 Jul 2020

Best Lawn Mowing Practices

Best Lawn Mowing Practices

During the spring and summer months, it’s natural to spend more time mowing your lawn due to the warmer temperatures and longer days that encourage healthy grass growth. Keeping your lawn healthy is essential, but the best mowing practices help ensure your lawn looks the best it can from early spring until late autumn. We’ve rounded up the best lawn mowing practices you can adopt and use on your lawn below.

1. Pick Your Height Based on Your Grass Species

Did you know that different grass species have different growing heights? Your lawn mowing schedule will depend on your leaf blade size. Finer bladed grasses should get mowed shorter, and broadleaf grasses do better if you leave them slightly longer. St. Augustine grass does best when you leave it between 3.5 to 4 inches tall. If you have cool-season grass like Kentucky bluegrass, you should keep it around an inch tall. Take time to identify which grass you have and look for the cut height. This will help it thrive.

2. Have a Sharp Mower Blade

A dull mower blade will hack away at your lawn and leave it looking ragged and uneven. If you don’t install it properly, you’ll use the blunt edge as your cutting blade. You won’t be able to get a clean-cut, and it can injure your grass. If it does, this leaves areas for disease and insects to invade your grass and make it sick. You want to ensure you always use a sharp blade that you install correctly before you mow your lawn.

3. Mow Your Lawn at the Correct Intervals

You should mow your yard when it needs a trim, and you shouldn’t wait until it’s overgrown. If you heavily water or fertilize your lawn, or if it enters the active growing period, you may find yourself mowing up to twice a week. If it’s a drought or your grass is dormant, you might not have to mow at all. You never want to remove over one-third of your lawn’s leaf tissue at one time. So, if your desired height is around two inches, you have to wait until it’s three inches tall to cut it.

In the early spring, you may not need to mow your grass. However, you can still break your lawnmower out for those annual winter weeds. This can help keep the weeds down until you can apply herbicide.

4. Set the Correct Deck Height

Since you generally don’t want to remove more than one-third of the leaf tissue in one mowing session, it’s important to set your deck height. The lower you set it, the more frequently you’ll have to mow to keep it at your desired height without removing more than one-third of the tissue. There are usually more weed problems with shorter grass.

If you let your lawn grow too long and cut it back in huge portions, your grass can get very stressed. Stress makes grass pull nutrients up from the root system, and this will kill your grass. You’ll end up with a thin and unhealthy lawn. 

Contact Evergreen Landscaping Today

Do you have questions about your lawn’s preferred height, species, and mowing practices? If so, you can reach out and contact our staff for assistance.

24 Jun 2020

Low Maintenance Landscaping for Commercial Properties

Low Maintenance Landscaping for Commercial Properties

You can dedicate a lot of time to upkeeping the landscape around your commercial property. However, there are dozens of low-maintenance landscaping ideas you can incorporate into the property to keep it looking sleek and welcoming with minimal effort on your part. We picked out the biggest trends sweeping commercial properties in 2020 below. 

1. Invest in Mulch Beds

Yes, flower beds look very nice around commercial properties. But, the weeds that push up through the dirt are unsightly. Creating mulch beds around your flowers is one way to feed your plants, retain moisture, and combat weeds. You can create an eye-catching look with darker mulch and bright flowers. It may even save you on your water bill. 

2. Plant Perennials

Perennials come back year after year, and they make a great investment for commercial properties. Hens-and-Chicks are a tough perennial that grows in bunches with deep green foliage, and you can add in two or three yuccas to fill in the spaces with spiky and large leaves. They grow well in challenging environments. 

3. Use Containers and Potted Plants

If you don’t have space for traditional flower beds, use containers. Potted plants are very low-maintenance, but they add versatility to your landscape. You can easily move them and rearrange them to suit different events you have or season changes. 

4. Consider Installing Artificial Grass

Grass can make or break your commercial property, and it can be a lot of work to keep it looking neat, groomed, and green. Taking it out and installing artificial grass takes all the work away. It’s no hassle, and it’ll look green and lush all year round. 

5. Choose the Correct Stone

Although it can be slightly more expensive upfront, investing in a durable stone with a dense composition can make it last. Stone comes in a variety of colors, and it adds a wonderful natural element to your property. You could set up a hardscape pathway around your business to cut down on the maintenance. 

6. Get Native Plants

One of the biggest things people fight with around their commercial properties is trying to keep non-native plants alive and thriving. Do a little research and find out what plants are native to your area. This research could include some tall grasses to fill in empty spaces and bright perennials. Find out which ones will thrive and plant them. 

7. Automate Your Watering

Trying to remember to water every day can be a struggle, especially if it’s a larger commercial property. Instead, take steps to install an irrigation system and automate it. If you do this, the sprinkler system will come on at the same time and water everything without effort. 

8. Lay Weed Barriers

Weed barriers are nice to put in all of your flower beds. You can cover them with a layer of mulch or crushed stone to hide the barrier. The barrier will also help retain heat close to the plants while preventing moisture from puddling. This barrier comes in several colors and styles. 

Contact Evergreen Landscaping

If you’d like more low-maintenance landscaping tips, contact us at Evergreen Landscaping. Our staff is ready to answer your questions and help you get your commercial property looking nice and neat.

10 Jun 2020

How to Control Invasive Plants

How to Control Invasive Plants

Invasive plants can wreak havoc on the natural ecosystem, and it can be very difficult to control or remove them once they take hold. But, we’re going to outline what an invasive plant is, and we’ll talk about the steps you can take to control and remove them from your area below. 

Defining Invasive Plants

An invasive plant is a blanket term used to define a species of plant that spreads, grows aggressively, or displaces the native plants. It becomes a weed pest that is very difficult to get rid of. These types of plants tend to show up on the disturbed ground. Even more concerning, the most aggressive invasive species of plants can invade the existing ecosystem and kill off the native plants. 

How to Control Invasive Plants

There are a few ways you can control an invasive plant species. The best avenue is through early detection and prevention. The goal is to stop them from going to a new area and continuing to spread. There are a few things you can do to control invasive plants, including: 

  • Encourage the local plant community’s health
  • Minimize soil disturbances
  • Ensure your equipment and vehicles contain no invasive seed or plants
  • Use certified weed-free mixes
  • Limit how much you move infested gravel or soil
  • Treat any new infestation very quickly
  • Contain any close infestations and restrict movement to them


You can also mechanically mow or cut down invasive plant species to limit how much seed they produce and spread. Manual control involves hand pulling or digging up the plants to prevent the spread. Once you have the invasive plants under control, it’s time to start removing them, so they don’t accidentally get worse. 

How to Remove Invasive Plants

It may be slightly difficult to remove these invasive plants, and this is especially true if they’ve already taken off. You can break down the removal methods into three broad categories. We touched on two above, but we’ll go slightly more in-depth.

Mechanical
Mechanical removal involves cutting down the plants using a mower or other lawn tool before the plants spread. The faster you cut these plants, the fewer chances they have of spreading seeds. Mechanical removal is popular for large swaths of growth because you can use commercial-grade mowers to cut through them.

Manual
If you have small patches of invasive plants, manual removal may be the easiest course of action. To do this, you’ll manually pull or dig up the plants with the roots. You can also cut the plants with hand shears to prevent them from seeding. However, you have to stay on top of the plants, or they’ll keep coming back.

Chemical
Chemical control is using herbicides to kill the plants. Chemicals can also stunt the plant regrowth, and this allows you to kill off large patches of invasive plants within a season or two. It’s popular in commercial operations where the invasive plants are killing the natural ones. 

When to Call in a Professional

If you don’t have the time or equipment to take on an invasive plant species and keep working at it to kill it, you’ll want a professional. A professional will have all of the tools and knowledge to know the best way to take on the plant species, inhibit growth, and remove it.

If you have a problem with invasive plants, contact us. Our staff is ready to come out, look at your problem, and suggest a containment and removal method so you can take your yard back.

20 May 2020

How to Keep Your Hardscapes Clean

How to Keep Your Hardscapes Clean

Hardscapes are an excellent way to give your property a facelift. They’re relatively low maintenance compared to other types of landscaping. However, you will have to periodically work on them to keep them looking their best. Since this is one thing that any visitors will see almost right away, we’re going to give you several tips to help keep your hardscapes looking nice all year round. 

Tip One – Regular Checkups

Although hardscapes are less maintenance than other landscapes, they do need regular checkups. If the ground settles or tree roots grow through your hardscape, it can cause damage. It could look uneven and create a tripping hazard. The individual bricks, rocks, or pavers could crack or shift. Making a point to perform regular checkups will help you catch problems right when they start. In turn, it’ll usually be more cost-effective to fix them. 

Tip Two – Schedule Annual Cleanings

At least once a year, you’re going to want to clean your hardscapes. This usually means that you’ll pressure wash them to get rid of any debris that develops from being exposed to the elements like dirt or rotting leaves. It’ll improve the hardscape’s durability. At least once a month, remove any weeds or unwanted plants from around the edges of your hardscape. If you call in a professional, they will most likely perform this low-maintenance cleaning on a weekly or bi-weekly basis.

Tip Three – Seal Annually

A sealant on and around your hardscapes can help make them last longer. It makes them less resistant to breaking down and cracking because it creates a barrier between the hardscape and the elements. This sealing process is usually a once-yearly project. It can give your hardscape a matte finish or a slight sheen that makes it look like new again. 

Tip Four – Get Rid of Debris

Debris like dirt, soil, grass clippings, or leaves can pile up in areas of your hardscape. If this happens, it can cause issues over time. The debris will work into the cracks of your hardscape and make it difficult to get them back out. The rotting plant life also encourages bacteria and fungi to grow, and these things can cause a lot of damage to your lawn. 

Tip Five – Spray for Weeds

Weeds can cause cracks to form in your hardscape, especially if you let them grow season after season without trying to get rid of them. Applying a herbicide around your hardscape will help to combat weed growth. You can apply it on a once-monthly basis. If you decide to pull the weeds, make sure you’re getting the root at the same time. 

Tip Six – Call in a Professional

If you’re not sure how to clean and maintain your hardscape, call in a professional. Maybe you don’t have the time or equipment. If so, a company can bring everything you need to your home and keep your hardscapes in peak condition all year round. 

Contact Evergreen Landscaping Today

Are you ready to clean your hardscape? Maybe you want to incorporate hardscapes into your existing yard. Whatever the reason, we’re here to help. Reach out and get in touch with our friendly and professional staff today.